Troubleshooting Manual
Safety first!
Before operating or troubleshooting your Ariens snowblower follow the safety rules first as not proper snowblowers handling can result in severe damage or death of not only operator but also people in close area:
- you should never inhale gases coming from snowblower exhaust, no adjustments to emission controls should ever be done
- always disengage the auger, engine and stop unit, remove the key and wait for all moving parts to stop before you leave the snowblower. Moving parts are able to amputee or crush body parts
- modern snowblowers are equipped with number of decals. Follow safety instructions for each decals as those occur- always turn own the engine when you expect sudden vibration,
- before starting the blower inspect the area where it will be working, make sure there are no boards, wires, slides etc
- keep operating area free of people (especially children) and pets
- three wire plugin should be used for all electric drive units
- don’t do any adjustments while engine is running
- let the snowblower adjust to outer temperatures before you start the engine
Remember to fill the tank with clean and fresh gasoline before you put your snowblower into operation. Visually check that your snowblower is in good condition before starting the engine. Each modafinil pillr is equipped with operators protection interlock system. Every time you engage the attachment clutch you need to depress the left handlebar, otherwise engine will be stopped. In those cases operator should always be located behind the handlebars. If you want to set your snowblower in fix position you should turn the differential lock on (located it the left wheel hub), you are sure that it was turned on when you hear slapping sound. Thanks to differential lock your mower will stay in the same position without moving to the left or right.
Ariens Snowblower controls
There are number of tools that allow snowblower controls. All of the parts are mentioned below:
- Tractor clutch lever- activates tractor’s – to move depress it, disengage to stop machine
- Throttle- controls engine speed. It should be put to slow/ fast position in order to protect throttle from freezing
- Speed selector- sets tractor’s speed for forward or reverse movement
- Clutch attachment- activates impeller and auger
- Choke- starts the engine when tractor’s choke is in proper position
- Hand crank- turns chute discharge allowing snow being throw away from the cleaning area
- Key switch-turn on and off, prevents unauthorized usage
- Starter button- to be pushed when operator wants to start, it can be put into started block to prevent unauthorized usage
- Premier button- injects the gas directly into carburetor
Before starting the snowblower and its controls you should first make sure that impeller fan and throttle are not frozen (it happens frequently when there is wet slushy snow). You can warm up both controls by starting the engine and letting it run for few minutes before you start to blow the snow itself.
Proper operation of snowblower requires to move reflector to the desired position and rotate discharge. After that is completed you should choose the right speed and launch the attachment clutch and traction drive clutch. When you are moving your snowblower from one area to another you should always stop auger first. Drift cutters should be used in situations when auger housing is lower than the snow level that is to be cleared.
Service and maintenance
Like any other snowblowers, xanaxbars.net need periodical service and proper maintenance (every 25 hours). Ariens engines are the only parts that can be serviced at an engine manufacturer service stations. Following actions will be handled, checked and fixed at the service station:
- operation of the clutch lever
- fasteners adjustment
- dual handle interlock
- clutch cable adjustments
- engine oil exchange
- machine lubrication
- tire pressure
Ariens snowblowers troubleshooting
Table 1. Most common issues and it solutions for Ariens Hydro- Professional snowblower models
| Issue | Possible cause | Action |
| Belt squeals continuously | Frozen impeller, attachment clutch needs adjustment | Move snowblower to warm area, adjust the clutch |
| A lot of now left behind | Worn or damaged blade scraper | adjust when worn or replaced when damaged |
| Machine pull to the one of sides | Scraper blade or skid shoes need adjustment | Adjust as necessary |
| Small rubber pieces collected in frame | Friction disk wear | Replace in service station |
|
Machine doesn’t or poorly throws the snow
|
Shear bolts are broken | Replace shear bolts |
| Frozen impeller | Move snowblower to warm area or replace impeller | |
| Break not adjusted correctly | Adjust break per operators manual | |
| Sth is obstructing the auger | Remove obstuction while engine is switched off | |
| Auger drive belt worn or damaged | Replace auger drive belt | |
| Auger drive belt is slipping | Adjust auger drive belt | |
| Discharge chute is clogged with snow | Remove discharge while engine is switched off |
Table 2. General issues and it solutions applicable for Ariens snowblower models
| Issue | Possible cause | Action |
|
Engine won’t start
|
Choke is off | Switch on |
| Engine switch is off | Switch on | |
| Engine key is not put in | Put the key in | |
| Engine not primed | Press primer buld twice and start the engine once more | |
| Spark plug faulty | Replace the spark plug | |
| Spark plug wire disconnected | Connect the wire | |
| Fuel tank empty | Fill with fuel | |
| Fuel valve closed | Open fuel valve | |
| Ignition starter circuit fault | Repair in service station | |
| Engine cylinder flooded | Repair in service station | |
| Engine fault | Repair in service station | |
| Carburetor dirty | Clean carburetor | |
|
Engine stops
|
Fuel tank empty | Fill with fuel |
| Fuel valve closed | Open fuel valve | |
| Auger or impeller obstruction | Remove obstruction while engine is switched off | |
| Fuel supply contaminated | Replace with clean fuel | |
| Spark plug faulty | Replace the spark plug | |
| Blocked fuel cap | Replace fuel cap | |
|
Engine runs poorly and starts hard
|
Blocked fuel cap | Replace fuel cap |
| Spark plug faulty | Replace the spark plug | |
| Fuel mixture is too rich | Replace with clean fuel | |
|
Machine doesn’t go straight or reverse
|
Speed selector not adjusted | Adjust speed selector |
| Friction disk is worn | Replace friction disk | |
| Traction drive cable not adjusted | Adjust traction drive cable | |
| Machine works for a moment and then stops | Fumes build up in the fuel tank | Gently loosen the fuel cap |
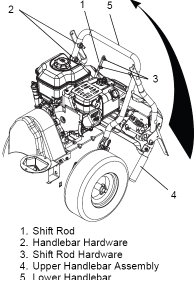
Handlebars assembly
In order to assembly the handlebars you should follow the steps in the order below
1. Lower handlebar- start from securing the unit so it doesn’t move during assembly. Rotate lower handlebar out from unit to assure that the mounting holes align with lower handlebar mounting on the unit frame. The lower handlebar should be secured to unit using two x 3/4 in and 3/8 in 5 hex head serrated blots of flange grade.Tighten all four bolts to 25-42 lbf-ft
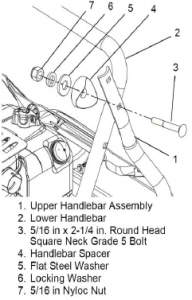
2. Upper handlebar- after the lower handlebar is assembled- assembly to lower handlebar using two sets of the handlebar hardware. One set should be each on each side of the. Don’t tighten hardware, the upper handlebar should hang from the lower handlebars (at this time)
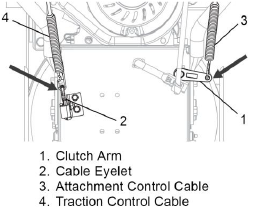
3. Cables attachment- secure the spring end of attachment control cable to the clutch arm. Fix end of the spring of the traction control cable to the cable eyelet on back of frame. Cable should remain in the groove of the pulley
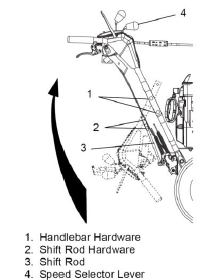
4. Unfold upper handlebar- settle handlebar in its operating position. Install the remaining handlebar hardware attaching the upper handlebar assembly to the lower handlebar, tighten if necessary, fit the shift rod into its position, re-tighten. Secure shift rod with speed selector arm, adjust selector, attachment and traction cables if needed
5. Connect wire headlight harness- it is normally connected to the upper handlebar assembly. You need to route the wire harness along the interior of the right side handlebar and then connect it to the electrical engine plug. Always make sure that the the wire harness to the handlebars is secure

6. Final assembly- remove the lower and loosen the upper hardware on the handlebar assembly. Loosen the shift rod hardware. Put the speed selector lever in the sixth forward position.Rotate the handlebar into operating position.
Re- tighten the hardware
The scrapper blade and runners functionality
Runners located on the sides of blower housing and scrapper blade located on the back of blower housing can be adjusted to present conditions. In order to control the distance between cleaned surface and scraper blade you should raise or lower the runners- loose or tighten nuts securing the runners, Remember to adjust runners on each side otherwise snowblower won’t keep desired position resulting in uneven cleaning surface. If your snow blower will be used on the gravel surface you should always lower the runners making sure that the machine won’t pick up the gravel. Scraper blade can be lowered to compensate for wear, although you should remember that if scraper blade is worn it should be exchanged otherwise it will cause further housing damages
Shear bolts replacement
When replacing shear bolts you should use only Ariens spare bolts as fitt all shear bolts may cause damage to machine or/and cause health or property damage to faulty machine functionality. Also your warranty will no longer be valid if you use not certified parts. With shear bolts in the shaft align shear bolt holes in auger. Put the bolts through the holes and fix them with nuts- till bolts don’t spin freely.
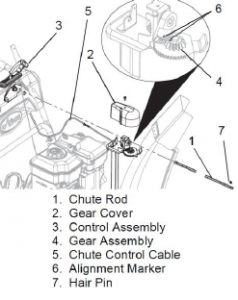
Discharge chute and deflector lever replacement
Put deflector control in the rear-most position. In order to adjust lower deflector tighten upper nut and loosen lower nut. In order to adjust higher deflector tighten lower and loosen higher nut. To adjust discharge chute start from removing the chute hear cover. Loosen existing adjustments and install new discharge chute and put back the gear cover
Speed selector adjustment
In order to adjust the speed of the speed selector lever you need to first disconnect speed selector arm from the pivot pin. Put the speed selector lever in forward fastest available position. Move the selector arm max down, insert the pivot pint in the hole that comes from shifting rod until it aligns with mating hole. Fix speed selector arm with pivot pin. Verify that reverse and forward speeds work properly.: unit moves forward with first forward position and traction drive clutch engaged, unit moves backward with reverse position and traction drive clutch engaged. If machine don’t drive well- make the adjustments once more
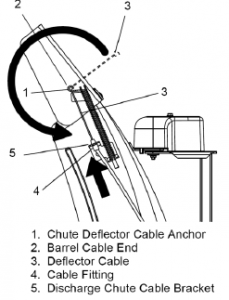
Remote deflector control cable replacement or installation
In order to replace or simply install new deflector control cable you need to connect the chute deflector cable anchor to the end or the barrel cable. Put the cable on the chute pedestal left side. Put in the barrel on the cable end, both should go into the left side chute deflector bracket. Now keep seal out of the way and move the cable through the left side of discharge chute bracket, press the cable fitting into the bracket. Secure the seal over the cable fitting end. Make necessary machine functionality checks. Adjust nut on cable end under handlebar if necessary
Belt replacement
Start from disconnecting the spark plug, never continue belt replacement without due to life danger risk caused by accidental engine start. Once that is done remove the housing- remove the hair pin cotter present in the chute crank assembly. Move the chute crank aside. Tip the machine to the back. Remove the screws fixing the belt guard and remove the guard. Continue with caps crews securing the snowblower housing removal. Roll the belt off the engine sheave between the belt finger and the sheave. Once belt is disconnected you can remove the housing and put it aside.
To replace the attachment drive belt you now need to slip the belt from the shave while holding the impeller brake away from the belt itself. Slip new belt into the belt position on the sheave. Fix its position on the brake shoe. Re-assemble the housing in re-verse order. Check machine’s normal functionality
To replace the tractor drive belt you now need to pull the idler and remove the belt from the sheave. Once done activate the clutch and verify that machine works normally. If it is working hard you can additionally pull back the blower back idler arm clevis pin
Snowblower housing replacement
In order to replace the snowblower housing you need to place the housing on the rod and securely tip the tractor and the blower together while holding the drive belt in up position. Use two cap screws to secure onto a frame. Tighten the screws while holding the handlebars up. Attachment belt should be rolled on the engine shave. Roll the belt under the belt finger into place while pulling the recoil starter rope. Check if there is at last 1/8 inch clearance around the whole finger belt (do it with engaged attachment clutch). Adjust if necessary. Verify that attachment belt and sheave are in alignment. Re-align if necessary. Do the same with blower sheave and break pads, Re-align is necessary. If belt slips it will need adjustment, that can be made by adjusting the idler in the idler arm slot- that can result in higher belt tension. Remember that when attachment clutch is disengaged, the belt should clutch. Replace the belt and crank parts, spark wire and readjust the chute crank
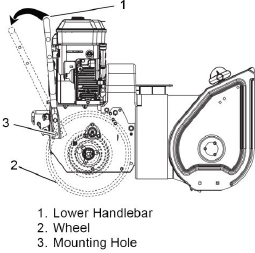
Friction wheel replacement
In order to replace the friction wheel you need to first tip the machine to service position and secure it properly. Then you should set the speed selector to first position. Once done disengage the traction clutch lever in order to not to hold the friction wheel. Loosen and remove all the bolts fixing the the wheel to the hub. Put speed selector to third position and disconnect the shift link. Install new friction wheel on the hub and replace or use old bolts to fix the wheel. Tighten, you can replace the bottom cover if that is severely worn too.
Ariens snowblowers storage
Snowblowers as any other household machinery is really used everyday. In most cases it is being used seasonally so it requires special storage in order to work properly though many seasons. In order to store your snowblower properly you need to start from verifying that the machine’s bolts (including engine bolts) are tightened properly, lubricate all relevant parts, remove the fuel from tank and run the machine for few minutes without snow throwing to prevent collector freeze up. Allow engine and all other parts to cool down before putting to storage place.
Remember that your local Ariens service dealer is the best point of contact when it comes to troubleshooting your machine. With any questions or concerns you should first turn to them